
Overview
Speed Paint is a free-for-all minigame inspired by Splatoon, where you race to paint the most surface area within the allotted time while avoiding obstacles to stay in the game
Terrain Painting
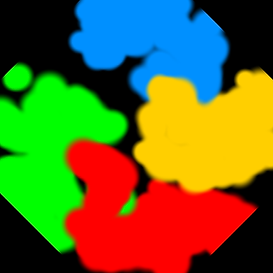
To paint the terrain, I used a mask texture in UV space. When a bullet collides with the terrain, the impact location is passed to a shader, which determines the corresponding position on the UV sheet and applies the paint. This approach requires the terrain to be UV-unwrapped with no overlapping triangles to ensure proper paint coverage.
Real-Time Score Calculation
In a minigame, player score must be updated in real-time rather than only displayed at the end. Since the terrain is painted using a mask texture, we can determine each player's score by calculating the fill percentage of each color—analyzing the pixels and counting how many belong to each. However, this approach presents a challenge: with a 1024x1024 mask texture, analyzing the entire image requires over a million iterations. Running this calculation on the CPU causes a significant drop in performance.
Calculating Score Using Compute Shaders
Compute shaders are GPU-executed programs that run independently of the rendering pipeline, making them ideal for offloading processing from the CPU. Written in HLSL, they allow for efficient parallel computation. Because they operate separately from the rendering pipeline, compute shaders were perfect for real-time score calculation, enabling the GUP to quickly analyze the image without impacting CPU performance.
Creating The Compute Shader
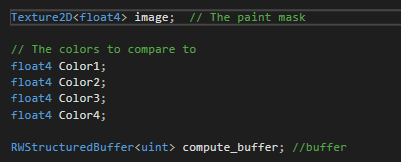
1. The first step in creating the compute shader was defining its properties, including the paint mask, the four target colors, and a compute buffer for reading and writing data
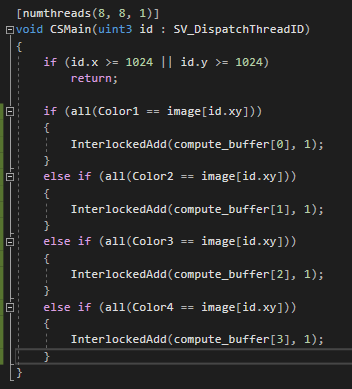
2. Next the shader analyzes each pixel in the image, counting how many match the target colors. when a match is found, the InterlockedAdd function increments the corresponding index in the compute buffer.
Steps To Use Compute Shader In Script
1. The first step is to assign the mask texture to the shader using the SetTexture method.
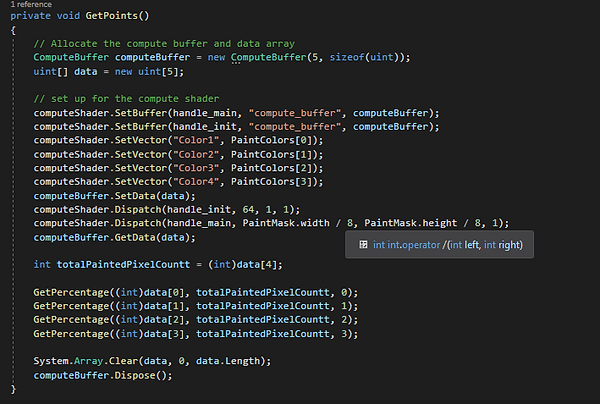
2. In the update loop, we call the GetPoints function, which sends the four target colors to the compute shader, dispatches it, and then reads and processes the returned data.
Once the compute shader was set up, I could calculate and display the coverage of each paint color in real-time with no impact on performance.
UV Mask
Although I could efficiently calculate the coverage of each paint color, there was still an issue with score calculations. Since the only available data came from the paint mask, I could only determine the coverage of each color within it. This would have been fine if the paintable area were a perfect square filling the entire UV sheet. However, because the minigame arena is an octagon, I needed a way to identify which pixels of the paint mask overlapped with the island on the UV sheet.
There were a few possible solutions. One approach was to calculate the area of the octagon and its proportion of the UV sheet. However, this method was limited to this specific case and wouldn’t scale well. Another option was to use modeling software like Blender to export an image of the UV sheet as a mask. The downside was that any changes to the arena would require re-unwrapping the terrain and generating a new mask manually in Blender.
To avoid this extra work, I decided to create another compute shader that would generate the UV mask automatically, ensuring that the process remained dynamic and adaptable.
Steps To Generate UV Mask
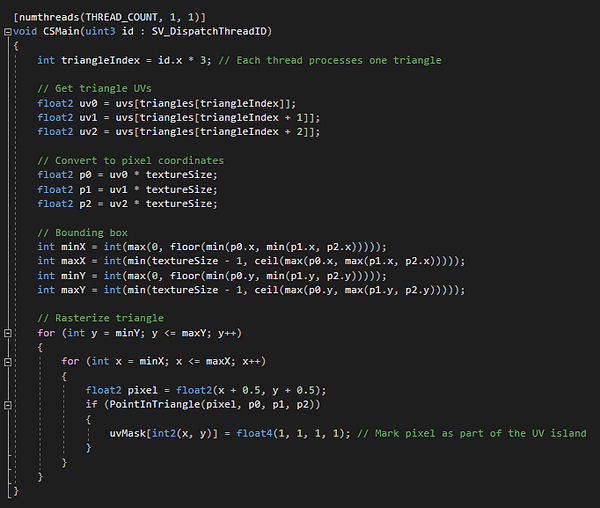
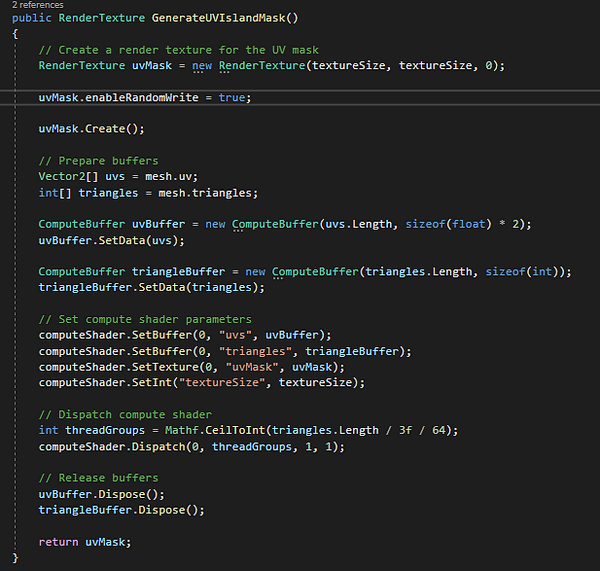
1. As with the score calculations, the first step was to define the necessary properties, including the terrain’s UV coordinates, triangle indices, and the output UV mask.
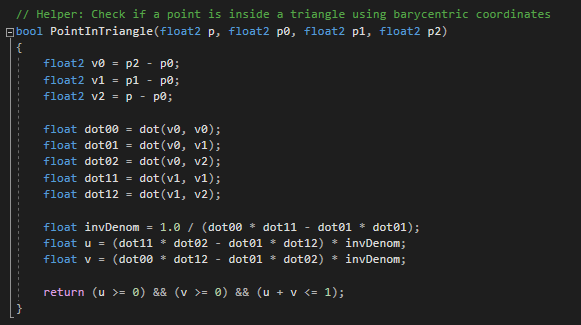
2. Next, I implemented a function that uses barycentric coordinates to check whether a point lies inside a triangle.
3. In the CSMain function, I retrieved the UVs of the current triangle, converted them to pixel coordinates, and rasterized the triangle to determine if it overlapped with a UV island.
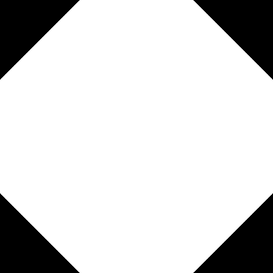
With these steps completed, I was able to generate the following UV mask.
Steps to Use UV Mask
To integrate the newly generated UV mask, several modifications were needed in the existing code:
1. A new property for the UV mask had to be added to the score calculation compute shader.
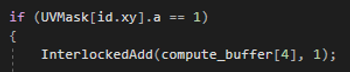
2. A check was implemented to determine whether the pixel being read from the paint mask corresponded to a pixel on the UV mask with an alpha value of 1. If so, a new index in the compute buffer was incremented to track how many paint mask pixels overlapped with an island on the UV sheet.
3. Like the score calculation shader, the compute shader for UV mask generation required a similar setup. However, since the mask only needed to be generated once, its setup and execution could be handled within a single function.
4. The UV mask also had to be assigned to the score calculation compute shader, just like the paint mask. To ensure proper execution, the UV mask generation function was called before dispatching the compute shader.